Overview
In the Automated* VPN Account Management post, I stated that I created a VPN Password Generator using Python. This section is a quick look at that project and code in detail.
I am a new programmer and I am only on Day 8 of Dr. Angela Yu’s 100 Days of Code – The Complete Python Pro Bootcamp for 2022 course as of the time of this writing.
Suffice it to say that I learned a lot so far and learned even more putting this password generator together, especially with all of the tools and packages used that the course didn’t cover yet.
Solution
Step One – Goal and Resources
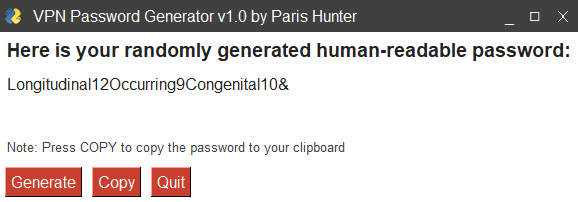
The goal of this VPN password generator is to randomly select 3 words from a set of 61000+ English words, counts the letters in each word, and randomly adds a compatible sign to the final string to generate a human-readable password.
In addition, I created a GUI using PySimpleGUI and created a windows-based executable using PyInstaller so the program can be packaged and run locally on Windows devices in the Museum for easy password creation.
Here is a video of the Windows program in action, showing off the Generate, Copy, and Quit buttons working along with the Always on Top modifier enabled.
Additional Features include:
- The ability to generate a new password just by clicking ‘generate’
- The ability to copy the password to the clipboard using pyperclip clipboard
- Always on top so the window can be closed at anytime
- A color scheme that matches the design of the Philadelphia Museum of Art’s website. I even used the closest font I could find to match the layout.


List all of the resources I used for this project:
- Python 3
- Visual Studio Code
- pyperclip
- english_words
- PySimpleGUI
- PyInstaller
- virtual environments (venv)
- pip install packages and modules
Step Two – My Project Code
Here is my Python code for this project:
And yes I comment. I mean why wouldn’t I? Have you SEEN the rest of the projects on this site? 😂
# VPN Password Generator - Version 1.0
# This VPN password generator randomly selects 3 words from a set of 61000+ words, counts the letters in each word, and randomly
# adds a compatible sign to the final string.
# Created by Paris Hunter www.parisdhunter.com

import random

# Imports Pyperclip to use to push the generated password to the clipboard
import pyperclip as pc

# Imports english-words 1.1.0 by Matt Wiens with 61000+ English words.
import english_words

# Imports PySimpleGUI by MikeTheWatchGuy to create the interactive window
import PySimpleGUI as sg

# This is the list of English words with lower case letters and no punctation stored in a set
# converted to a list for the random module to work

word_list = list(english_words.english_words_lower_alpha_set)

# The following signs are password friendly on most systems
signs = ['!', '#', '$', '&', '*']

# Randomly select word number one from the list, capitalize it and count the number of letters within the word
word_one = random.choice(word_list).capitalize()
length_one = len(word_one)

# Randomly select word number two from the list, capitalize it and count the number of letters within the word
word_two = random.choice(word_list).capitalize()
length_two = len(word_two)

# Randomly select word number three from the list, capitalize it and count the number of letters within the word
word_three = random.choice(word_list).capitalize()
length_three = len(word_three)

# Randomly select a sign from the sign list
chosen_sign = random.choice(signs)

# Combines all of the above into one string to use as the VPN password.
vpn = (f"{word_one}" + f"{length_one}" + f"{word_two}" + f"{length_two}"
 + f"{word_three}" + f"{length_three}" + f"{chosen_sign}")

# This is new PMA Theme
sg.LOOK_AND_FEEL_TABLE['PMA'] = {'BACKGROUND': '#FFFFFF',
                                        'TEXT': '#222222',
                                        'INPUT': '#339966',
                                        'TEXT_INPUT': '#000000',
                                        'SCROLL': '#99CC99',
                                        'BUTTON': ('#FFFFFF', '#C93F2E'),
                                        'PROGRESS': ('#D1826B', '#CC8019'),
                                        'BORDER': 1, 'SLIDER_DEPTH': 0,
'PROGRESS_DEPTH': 0, }

# This changes the theme of the window to match the PMA design styles.
sg.theme('PMA')

# Define the window's contents
layout = [[sg.Text("Here is your randomly generated human-readable password:", font= ('Avenir', 14, 'bold'))],
          [sg.Text(vpn, font= ('Avenir', 12), key='-OUTPUT-')],
          [sg.Text(size=(40,1),font= ('Avenir'), key='-OUTPUT-')],
          [sg.Text("Note: Press COPY to copy the password to your clipboard", font= ('Avenir', 10), text_color= '#404040')],
          [sg.Button('Generate', font= ('Avenir')), sg.Button('Copy', font= ('Avenir')) , sg.Button('Quit', font= ('Avenir'))]]

# Create the window
window = sg.Window('VPN Password Generator v1.0 by Paris Hunter', layout, use_custom_titlebar= 'true',titlebar_background_color= '#404040', keep_on_top= 'True', element_padding= 5,)

# Display and interact with the Window using an Event Loop
while True:
    event, values = window.read()
    # See if user wants to quit or window was manually closed
    if event == sg.WINDOW_CLOSED or event == 'Quit':
        break
    elif event == 'Generate':
        word_one = random.choice(word_list).capitalize()
        length_one = len(word_one)
        word_two = random.choice(word_list).capitalize()
        length_two = len(word_two)
        word_three = random.choice(word_list).capitalize()
        length_three = len(word_three)
        chosen_sign = random.choice(signs)
        vpn = (f"{word_one}" + f"{length_one}" + f"{word_two}" + f"{length_two}"
 + f"{word_three}" + f"{length_three}" + f"{chosen_sign}")
    # Updates the VPN password every time the 'generate' button is pressed
        window['-OUTPUT-'].update(vpn)

    # Copies the VPN password to the clipboard every time the 'copy' button is pressed
    elif event == 'Copy':
        pc.copy(vpn)

# Finish up by removing from the screen
window.close()
Future Features
If I was going to work on this in the future, there are a few things I would change:
Icon on Titlebar – Change the icon on the Title bar from the Python logo to a custom logo. I did the work to create a custom logo but I couldn’t get the image to display. I could have used an ICO file type but I wanted cross-platform compatibility (for Mac OS) so I ended up attempting Base64 to make the logo work. It didn’t work out for me and PySimpleGUI this time.
Icon on Windows Taskbar – There is NO icon on the Windows Taskbar to show that the program is even open/running so I that’s one reason why I made it ‘Always on Top’ so I (or another user) can’t lose it.
Icon on the Exe – The icon on the EXE was placed by Pyinstaller and it is simply a snake on a floppy disk. I am sure I could change those options when building the distributable, but it literally was my first time using it. And in addition, I would change the metadata about the project (creation date, version, etc ) as well.


